All the comment below also apply to Epipactis gigantea (the Chatterbox orchid) from the USA
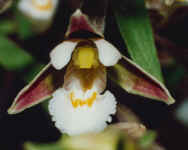
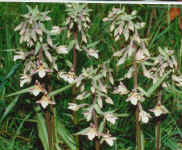
The name tells you most of what you need to know - it does not like to dry out at any time, (however it does not want to be in stagnant water either). This species is said to be the easiest wild orchid to grow in a garden. Like the Bee orchid it likes a lime rich soil which is moisture retentive, but never water logged and stagnant. This plant has very attractive, though rather small, flowers. When the shoots come through in late April/early May, they may be a very striking purple colour before they become green.
The Marsh helleborine does not form tubers like most of our common orchids, but has fleshy roots. The orchid is also unusual in that it multiplies both by seed and vegetatively - it won't take many years to fill a pot if it is happy. All British native orchids have tiny seeds, the Marsh Helleborine is even more difficult to germinate than many of the others - the seed must absorb water and then endure a period of frost before it will germinate. This is not unusual in other British wild flower seeds which contain large food reserves e.g. sweet violet and cowslip.
My first attempt at growing this species was to take a 3 gallon builder's bucket, drill some 6 mm diameter drainage holes in the sides about 2-3 inches (5-7 cm) above the base, put some pots in the bottom of the bucket and then a solid shelf of twin walled plastic on top of them such that it was just above the drainage holes. A wick of cloth going through this shelf and to the bottom of the bucket ensured that the reservoir would continue to supply water even as the water level fell. Potting compost was added on top of the shelf then a layer of 4mm grit on top to help cut down the evaporation rate and ensure that it was not necessary to water the pot more than once every few of weeks in summer, even when there was no rain. This worked as the plant had 4 shoots at the end of the first year, then 11 at the end of the next and over 30 the next year. At this point it was clear that a larger container was needed so a 50 x 100 cm raised bed was planned. At this point it was discovered that when it rained the water level reached the top of the bucket, investigation showed that the plant roots were at the bottom of the grit layer, rather than in the compost, that the drainage holes were blocked and that the compost did not smell too good.
The planned raised bed was then constructed to prevent these problems, the construction was limestone rather than plastic bucket and the drainage holes were 12 mm diameter rather than 6 mm. The compost was diluted with grit and Vermiculite in the top 25 cm of the bed. The orchids were replanted and multiplied rapidly, this time the roots were 20 –25 cm below the surface, but as the compost aged and compressed in subsequent years they came nearer to the surface again. Last year I stopped counting at 300 flowering spikes in the 1m x 1m bed and found it very difficult to separate orchids out as there were so many roots – it was like a very well established clump of Couch grass.
This orchid responds well to fertilizer, unlike Cypripediums which are reputed to dislike anything other than the merest hint of fertilizer. It is easy to grow and cheap to buy and I could recommend it to anyone.
One diference between E. palustris and E. gigantea is that the latter is less tolerant of high total dissolved solids so be careful if using permanently hard water to water them.
GROWING FROM SEED
In a British kitchen rather than a proper laboratory!
Mrs Beeton is reputed to have always started her recipe for rabbit pie with "first catch your rabbit". In the case of raising orchids from seed this should start with "first obtain the seed by legal means, don't dig plants from the wild, and don't buy plants that others have dug up". Until you have a track record of success you are unlikely to obtain permission to collect seed from Nature Reserves. For some species even a good track record may not be enough. It is normally much easier to obtain permission to collect a small quantity of seed from private land owners. A single seedpod can contain more than 10000 seeds so one pod should be enough to start with. In the UK the law provides for fines of up to 5000 pounds per plant dug up or damaged without permission (collection of a seed pod would be regarded as damaging the plant).
A further point is don't forget to OK the procedure that you are planning with the normal occupant of the kitchen first!!
It is possible for amateurs to raise terrestrial orchids from seed - I have a number of friends who do so, each has his or her own favourite recipes for the agar, and the method. All of the methods seem to work as long as there is no contamination so feel free to alter things. A number of articles have appeared in the Hardy Orchid Society newsletters (a link to their web page is in our LINKS page). If you have a number of choices to make you can pick the one that you think will be easiest for you. Not all species of orchids can be propagated artificially at present, the ones that are regarded as easy for beginners in England are the Dactylorhizas, Anacamptis (Orchis) morio and the Bee orchid Ophrys apifera. It is easier to grow species that are native as you can observe them in the wild, and hence assess their growing conditions, and you know that they are hardy outdoors.
Equipment -
Tweezers and a DIY dentistry type plaque removing tool - sterilised in my standard bleach solution are useful.
Pressure cooker - used to sterilise the agar solution and subsequently jam jars or Petri dishes (if sterile plastic ones are not used). Kilner jars are difficult to fit into a pressure cooker but can be heated in a domestic oven to 110C safely. All jars must have their lids off during sterilisation in order to avoid explosion an explosion risk!
Clingfilm
Trigger operated garden/indoor plant spray.
Home made sterile cabinet.
Containers for protocorm formation - I have used Bibby Sterillin square petri dishes in the past which came wrapped in sterile plastic bags containing 4 dishes. Other Petri dishes or jam jars are OK, I found square Petri dishes easier to handle. I have experienced problems keeping Petri dishes sterile when temperatures fuctuate, particularly round ones. Following a suggestion from John Haggar I am now successfully using Kilner jars instead of Petri dishes. A popular choice is 1lb honey jars with plastic lids, these can be sealed with film or a hole made in the cap which is then tightly stuffed with sterile cotton wool.
Sterile cabinet -
I use a home made box 18" x 18" x 24" high made from melamine faced chipboard and transparent rigid plastic sheet. The base, back and two sides are chipboard and the top and front plastic. Before starting I use a trigger operated garden type spray gun containing 1 part domestic bleach solution to about 9 parts deionised water to spray the entire interior of the box (and leave it wet). This only remains sterile if no air is flowing. I restrict the front hole of the box with sprayed Clingfilm when I don't have my hands in it. Kitchens are best avoided for the actual sterile cabinet as they tend to contain many different bacteria and moulds, particularly if vegetable matter is collected for composting.
Seed sterilisation -
There are several schools of thought - one allows the seed pods to dehisc, wraps the seed in a filter paper and sterilises the resulting packet. Another takes green pods about 6 weeks after pollination and sterilises the outside of the pod in 1 part domestic bleach (NaOCl) to 9 parts water for 30 minutes. When possible I usually use the latter technique as I find it easier. The third option is to use a tube for sterilisation, either with the seed floating on the surface (this requires VERY vigorous agitation for the entire sterilisation period and can become tiring if many species are to be sown) or using a filter tube.
The following instructions are specific to the
plastic filter tubes that I can supply.
With the blue cap fitted to the filter end put some seed inside the tube.
The tube and seed are normally either wet with a drop of isopropyl alcohol
(propan-2-ol these days) easily obtainable as spectacle cleaner or with a single
drop of washing up liquid and then diluted bleach added. If the bleach contains
surface active agents e.g. Thick Domestos the wetting agents are not needed. The
aim is to have approximately 1% free chlorine in the final solution so 1 part
Domestos to 9 parts of water or 1 part Tesco Value Bleach to 4 parts of water
should be OK.
Fit the white cap to the open end of the tube and gently agitate, the seed
should be in the liquid rather than floating on the surface.
It is normal to continue the sterilisation until the seed becomes slightly paler
than it was when sterilisation commenced. When the sterilising is complete the
end caps are removed and the solution drained from the tube through the filter,
if the blue cap is replaced, a small quantity of sterile water can be added and
the seed plus liquid pipetted onto the media.
Some people advocate washing the seed with sterile water before doing this, it
is probably wise to do so if you are using a thick bleach but it is unnecessary
if you use Tesco Value bleach solutions. Transferring a tiny amount of bleach to
the media can have advantages for maintaining sterility.
After the seed has been sown any seed remaining in the tube can be washed out by
washing from the filter end.
Some growers like to soak the seeds in a 5% sugar solution for a day or two
before sterilising with bleach. The idea behind this is that the sugar solution
encourages any dormant spores to grow and then be sterilised whereas there is a
possibility of them breaking dormancy on the agar if the sterilisation period is
too short. This should be less of a problem using the clear tubes than with the
sealed packet method as any decrease in bleach strength can be compensated for
by bleaching longer until the seed colour starts to decrease.
Germination medium -
This is a contentious area - some are better than others but 6-9g agar per litre with about 10-15g sugar per litre and half strength liquid fertiliser seems OK for protocorm formation. Some orchids howevere require the addition of extracts of pineapple, potato or swede turnip in order to grow well. I normally heat the water in a pan, prepare the solution and then cook for 30 minutes in a pressure cooker at the maximum recommended pressure. I then allow the pressure cooker to cool in my sterile box before removing the lid. I then cover the container with Clingfilm sprayed with bleach until it cools then pour into the containers. I then leave this to solidify, if green podding holding the seed pods in the tweezers use the dental tool to open the pods and extract the seed direct onto the agar. The same tool can be used to spread the seed a little if you have clumps. The lid is then placed on the dish before I spray a generously sized piece of Clingfilm and wrap/fold over the Petri dish one side at a time (I find this is easier with square Petri dishes). It looks messy with 4 layers of clingfilm on the bottom, but it works for me (I have never succeeded when putting only a narrow strip of film around the join as temperature cycling usually results in contamination). This is then stored at room temperature in the dark for a couple of months by which time the seed should have swollen to yield what are now called protocorms. At this stage Dactylorhiza protocorms should be exposed to cold temperatures for at least 6 weeks ( I prefer not to freeze them). After this time bringing them back to room temperature should initiate leaf formation, when this happens they should be exposed to day light. At this stage I tend to re-plate them into deeper containers with at least 1" agar in the bottom and 1g/l charcoal in the mixture. If fungus is available it can be added at this or the seed sowing stage (add ground oats to the agar growth medium instead of sugar if fungus is used). I leave seedlings in this for at least a year and plant out in Spring, usually I cover them for a while to make it easier for them to adapt to a less than 100% humidity environment. Don't keep the covers on too long or they may turn mouldy and die!
When you have succeeded with the easy ones, more challenging species can be attempted - Cypripedium seed germination is covered on some internet pages e.g. those of Carlson Whitlow. Details of raising other species can be found in the technical literature.
GOOD LUCK
Herbicides
There has been some discussion over the internet about herbicides. My view, and that of a number of others, is that although orchids are monocotyledons and the herbicides used on roadside verges are designed to kill dicotyledons, they damage orchids. A number of the contributors felt that it is repeated applications (or an over-application) that damaged the orchids, there were also suggestions that some orchids may be slightly more tolerant than others. There were some that said that orchids did better after herbicides had been used. Some orchids don't appear until late in the season so the application of herbicides early in the season may not have any effect on them, this implies that the two views need not be contradictory. In the UK orchids have definitely disappeared from many fields due to the applications of herbicides, fungicides and fertilizers. They also disappeared from most road verges when it became fashionable to eliminate the "weeds" along the road, this fashion has now thankfully been replaced, possibly in order to save the cost of herbicides and the danger to the people applying them. I personally suspect that fertilizers have a role to play in this also, not because the orchids don't like fertilizer, but because other plants are able to out-compete them and because high ammonia fertilisers may be toxic to some fungi. The application of fungicides may also be harmful by eliminating any symbiotic mycorrhiza, this is most likely to effect recruitment and orchids growing in marginal habitats.